
Laser cutting is valued for its precision and versatility in processing non-metallic materials, with wood, acrylic, and leather being top choices for crafts, advertising, and custom manufacturing. Many users face issues like charred edges, incomplete cuts, or material deformation due to incorrect parameter settings. The secret to successful laser cutting is matching parameters to material properties.
This guide outlines key parameters (power, speed, frequency) for each material, highlights common mistakes, and offers practical solutions to help you get perfect cuts consistently.
Key Laser Cutting Parameters to Understand First
Before exploring material-specific settings, master these three core parameters that directly impact cutting quality:
-
Power: Controls the energy applied to the material. Too low = incomplete cuts; too high = charring, melting, or damage.
-
Speed: Regulates laser head movement. Slow speed = heat buildup (charring risk); fast speed = potential uncut material.
-
Frequency (CO₂ lasers): Number of laser pulses per second (Hz). Higher frequency = smoother edges but more heat; lower frequency = less heat but potentially rougher edges.
Note: The following parameter ranges apply to 40-150W CO₂ laser cutters (most common for non-metals). Adjust for your machine model and material thickness.
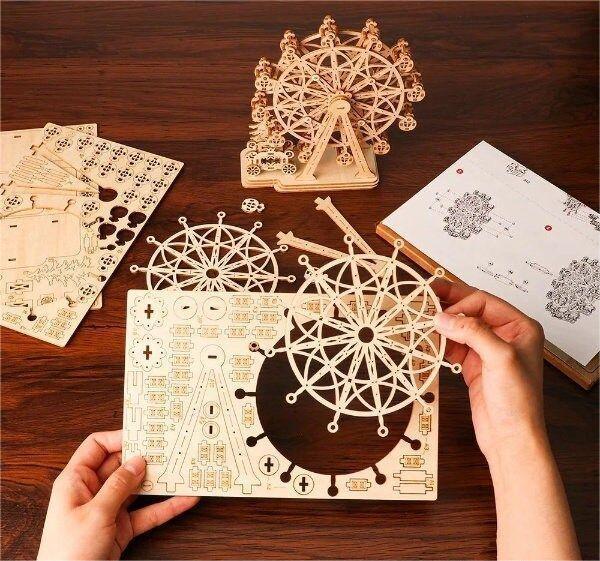
1. Wood Laser Cutting: Avoid Charring & Splintering
Wood is porous and flammable, making it prone to charring (especially softwoods like pine) and splintering. The goal is to balance power and speed for clean edges without excess heat damage.
1.1 Recommended Parameter Ranges

1.2 Common Pitfalls & Solutions
-
Pitfall 1: Severe edge charring
Solution: Increase speed, reduce power by 10-15%, or use air assist (blows compressed air to reduce heat and remove debris). -
Pitfall 2: Bottom surface splintering
Solution: Place wood smooth side up; use a sacrificial board (e.g., MDF) underneath to support cuts and prevent splintering. -
Pitfall 3: Incomplete cuts (thick hardwood)
Solution: Use two-pass cutting—first pass at 70% power (slow speed) for a shallow groove, then full power to finish. Avoid overloading the laser in one pass.
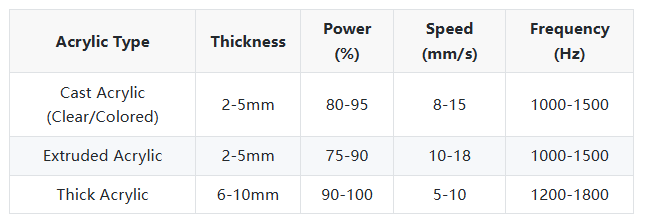
2. Acrylic Laser Cutting: Achieve Smooth, Transparent Edges
Acrylic (PMMA) is popular for laser cutting because it produces smooth, flame-polished edges. Improper settings cause melting, fogging, or uneven edges. Use high power and appropriate speed to melt acrylic evenly without excess heat.
2.1 Recommended Parameter Ranges
2.2 Common Pitfalls & Solutions
-
Pitfall 1: Foggy/frosted edges
Solution: Keep the laser lens clean (dirty lenses cause uneven heating); increase frequency to 1200-1800Hz; avoid dusty environments. -
Pitfall 2: Melting/dripping around cuts
Solution: Reduce power by 5-10% or increase speed; use air assist to remove molten acrylic and cool the area. -
Pitfall 3: White lines on clear acrylic
Solution: Caused by excess heat or low-quality acrylic. Use cast acrylic (higher quality than extruded) and adjust parameters to reduce heat—slightly increase speed while maintaining enough power for complete cuts.

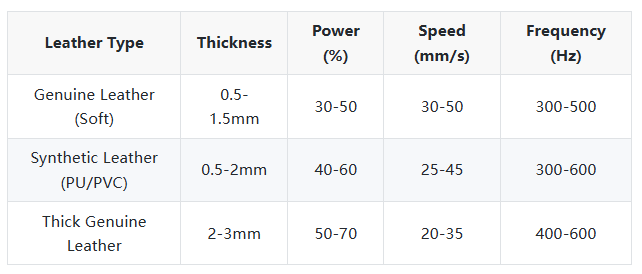
3. Leather Laser Cutting: Prevent Burning & Hardening
Leather (genuine or synthetic) is heat-sensitive. Laser cutting creates precise edges, but excess heat causes burning, hardened edges, or discoloration. Use low power and fast speed for best results.
3.1 Recommended Parameter Ranges
3.2 Common Pitfalls & Solutions
-
Pitfall 1: Surface burn marks
Solution: Reduce power by 10-15% and increase speed; use low frequency (300-500Hz); place a piece of paper between the laser head and leather to block direct heat. -
Pitfall 2: Hardened edges
Solution: Caused by excess heat. Lower power or increase speed; avoid multiple passes. For thick leather, use gentle two-pass cutting with reduced power each time. -
Pitfall 3: Fume-induced discoloration
Solution: Ensure proper exhaust (leather fumes are toxic); clean the exhaust system regularly; work in a well-ventilated area and wear protective gear.
General Tips to Avoid Pitfalls for All Materials
-
Test first: Always do a small test cut on scrap material to adjust for factors like wood moisture or leather thickness variations.
-
Maintain your machine: Regularly clean lenses and mirrors (dirty optics reduce efficiency); check air assist airflow.
-
Use quality materials: Low-grade, high-moisture wood or impure acrylic is prone to cutting issues, even with correct parameters.
-
Adjust for your machine: Parameters are guidelines. Refer to your laser cutter’s manual for baseline settings, as brands/models vary.
Final Summary
Successful laser cutting of wood, acrylic, and leather depends on matching parameters to material characteristics. Avoid common issues like wood charring, acrylic fogging, and leather burning by following the recommended settings and solutions here. Always test cuts first and maintain your machine regularly to ensure consistent, precise results. For personalized parameter advice for specific machines or materials, contact our technical support team.
